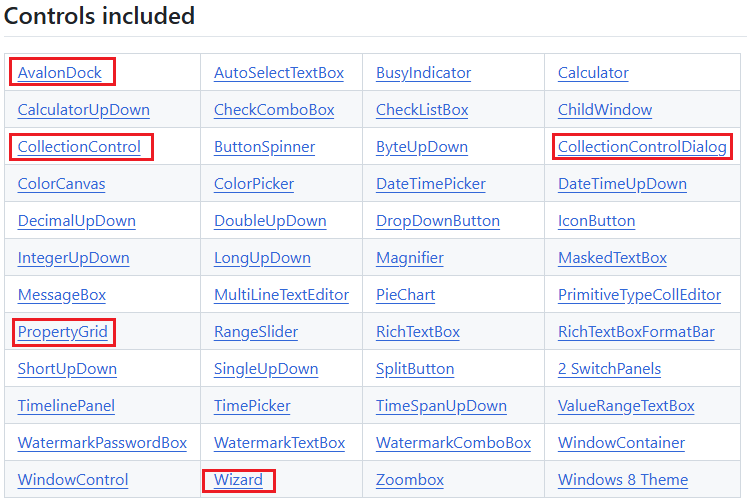
Extended.Wpf.Toolkit控件库是对WPF内置控件库的补充,提供了非常多的好用控件,可以帮助我们开发出交互性更强的桌面应用程序,是WPF程序开发的又一利器!
本文针对其中非常经典的几个控件做简要介绍,在后续项目中实际使用时可以更深入了解各控件用法。
文档:https://github.com/xceedsoftware/wpftoolkit
示例程序:Extended.WPF.Toolkit.Live.Explorer
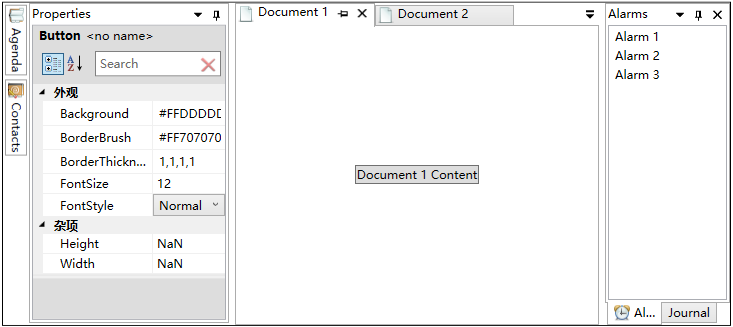
AvalonDock:为窗体程序添加停靠窗体,使得WPF能开发出类似MFC中的单文档和多文档应用程序。
PropertyGrid:非常经典的属性面板功能,在MFC和WinForm中均有该控件,这个控件高度还原了WinFrom中的控件样式。
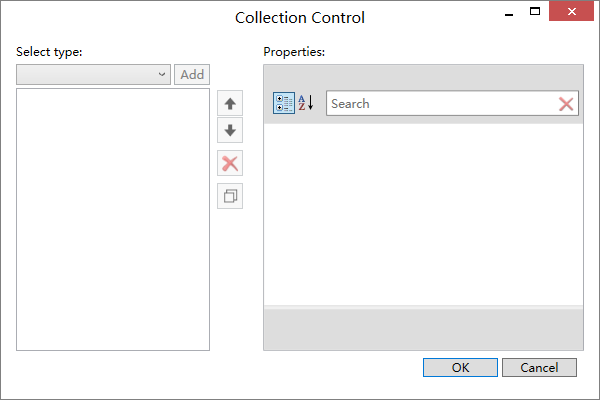
CollectionControlButton & CollectionControl & CollectionControlDialog:对一组对象进行属性设置,在WinForm中大量存在。
Wazard:借助该控件可以开发出向导式的程序,可以用于创建项目并设置参数的场景。
对该控件的使用,重点在于如何进行界面布局,以下是官方实例代码。
在实际项目中建议单独安装Dirkster.AvalonDock包,而不直接使用扩展控件库中的该控件。
1 2 3 4 5 6 7 8 9 10 11 12 13 14 15 16 17 18 19 20 21 22 23 24 25 26 27 28 29 30 31 32 33 34 35 36 37 38 39 40 41 42 43 44 45 46 47 48 49 50 51 52 53 54 55 56 57 58 59 60 61 62 63 64 65 66 67 68 69 70 71 72 73 74 75 76 77 78 79 80 81 82 83 84 85 86 87 88 89 90 91 92 93 94 95 96 97 98 99 100 101 <xcad:DockingManager x:Name ="_dockingManager" Margin ="10" AllowMixedOrientation ="True" > <xcad:LayoutRoot x:Name ="_layoutRoot" > <xcad:LayoutPanel Orientation ="Horizontal" > <xcad:LayoutAnchorablePane DockWidth ="200" > <xcad:LayoutAnchorable ContentId ="properties" Title ="Properties" CanHide ="False" CanClose ="False" AutoHideWidth ="240" > <xctk:PropertyGrid NameColumnWidth ="110" SelectedObject ="{Binding ElementName=_layoutRoot, Path=LastFocusedDocument.Content}" AutoGenerateProperties ="False" > <xctk:PropertyGrid.PropertyDefinitions > <xctk:PropertyDefinition TargetProperties ="Background" /> <xctk:PropertyDefinition TargetProperties ="BorderBrush" /> <xctk:PropertyDefinition TargetProperties ="BorderThickness" /> <xctk:PropertyDefinition TargetProperties ="FontSize" /> <xctk:PropertyDefinition TargetProperties ="FontStyle" /> <xctk:PropertyDefinition TargetProperties ="Width" /> <xctk:PropertyDefinition TargetProperties ="Height" /> </xctk:PropertyGrid.PropertyDefinitions > </xctk:PropertyGrid > </xcad:LayoutAnchorable > </xcad:LayoutAnchorablePane > <xcad:LayoutDocumentPaneGroup > <xcad:LayoutDocumentPane > <xcad:LayoutDocument ContentId ="document1" Title ="Document 1" > <Button Content ="Document 1 Content" HorizontalAlignment ="Center" VerticalAlignment ="Center" /> </xcad:LayoutDocument > <xcad:LayoutDocument ContentId ="document2" Title ="Document 2" > <TextBox Text ="Document 2 Content" AcceptsReturn ="True" /> </xcad:LayoutDocument > </xcad:LayoutDocumentPane > </xcad:LayoutDocumentPaneGroup > <xcad:LayoutAnchorablePaneGroup DockWidth ="125" > <xcad:LayoutAnchorablePane > <xcad:LayoutAnchorable ContentId ="alarms" Title ="Alarms" CanClose ="True" > <ListBox > <s:String > Alarm 1</s:String > <s:String > Alarm 2</s:String > <s:String > Alarm 3</s:String > </ListBox > </xcad:LayoutAnchorable > <xcad:LayoutAnchorable ContentId ="journal" Title ="Journal" > <RichTextBox > <FlowDocument > <Paragraph FontSize ="14" FontFamily ="Segoe" > This is the content of the Journal Pane. <LineBreak /> A <Bold > RichTextBox</Bold > has been added here </Paragraph > </FlowDocument > </RichTextBox > </xcad:LayoutAnchorable > </xcad:LayoutAnchorablePane > </xcad:LayoutAnchorablePaneGroup > </xcad:LayoutPanel > <xcad:LayoutRoot.LeftSide > <xcad:LayoutAnchorSide > <xcad:LayoutAnchorGroup > <xcad:LayoutAnchorable Title ="Agenda" ContentId ="agenda" > <TextBlock Text ="Agenda Content" Margin ="10" FontSize ="18" FontWeight ="Black" TextWrapping ="Wrap" /> </xcad:LayoutAnchorable > <xcad:LayoutAnchorable Title ="Contacts" ContentId ="contacts" > <TextBlock Text ="Contacts Content" Margin ="10" FontSize ="18" FontWeight ="Black" TextWrapping ="Wrap" /> </xcad:LayoutAnchorable > </xcad:LayoutAnchorGroup > </xcad:LayoutAnchorSide > </xcad:LayoutRoot.LeftSide > </xcad:LayoutRoot > </xcad:DockingManager >
总的来说,创建基于AvalonDock控件的布局主要分为三个部分:
创建展开状态的面板(Properties左侧面板、Alarms和Journal右侧面板组):xcad:LayoutAnchorablePane创建单个面板,xcad:LayoutAnchorablePaneGroup创建面板组。
创建中间文档面板组:默认占据其余位置,由<xcad:LayoutDocumentPaneGroup>代码创建。
创建上下左右四个方向的非展开状态的面板:由<xcad:LayoutAnchorGroup>创建。
其中前两类面板的位置由<xcad:LayoutPanel Orientation="Horizontal">这行代码控制,为水平布局,面板依次布置水平布置;非展开状态面板的位置由<xcad:LayoutRoot.LeftSide>代码决定,可以为四个方向分别指定非展开面板。
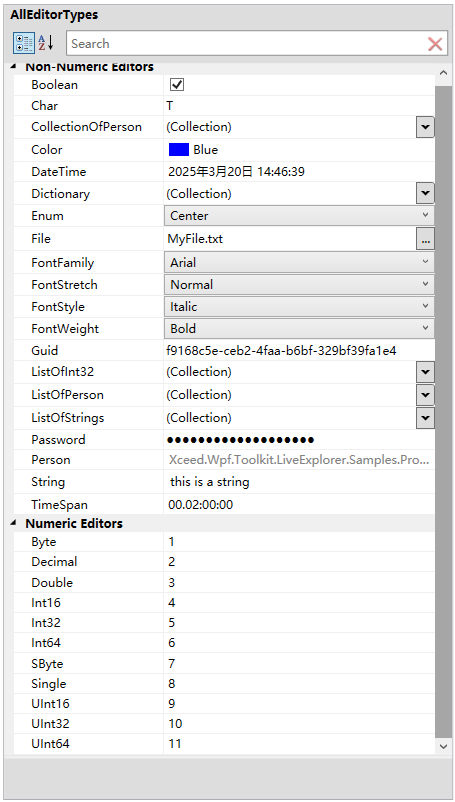
以下是非常通用的控件XAML模板,为常见数据类型都指定了编辑器:
1 2 3 4 5 6 7 8 9 10 11 12 13 14 15 16 17 18 19 20 21 22 23 24 25 26 27 28 29 30 31 32 33 34 35 36 37 38 39 40 41 42 43 44 45 46 47 48 49 50 51 52 53 54 55 56 57 58 59 60 61 62 63 64 65 66 67 68 69 70 71 72 73 74 75 76 77 <xctk:PropertyGrid x:Name ="propertyGrid" Grid.Row ="0" Width ="300" AutoGenerateProperties ="True" Background ="WhiteSmoke" SelectedObject ="{Binding ThisStudent}" ShowDescriptionByTooltip ="False" ShowSearchBox ="False" ShowSortOptions ="False" ShowSummary ="True" ShowTitle ="False" UpdateTextBoxSourceOnEnterKey ="True" > <xctk:PropertyGrid.EditorDefinitions > <xctk:EditorTemplateDefinition > <xctk:EditorTemplateDefinition.TargetProperties > <xctk:TargetPropertyType Type ="{x:Type s:DateTime}" /> </xctk:EditorTemplateDefinition.TargetProperties > <xctk:EditorTemplateDefinition.EditingTemplate > <DataTemplate > <xctk:DateTimePicker Format ="ShortDate" ShowButtonSpinner ="False" Value ="{Binding Value}" /> </DataTemplate > </xctk:EditorTemplateDefinition.EditingTemplate > </xctk:EditorTemplateDefinition > <xctk:EditorTemplateDefinition > <xctk:EditorTemplateDefinition.TargetProperties > <xctk:TargetPropertyType Type ="{x:Type s:Boolean}" /> </xctk:EditorTemplateDefinition.TargetProperties > <xctk:EditorTemplateDefinition.EditingTemplate > <DataTemplate > <CheckBox IsChecked ="{Binding Value}" /> </DataTemplate > </xctk:EditorTemplateDefinition.EditingTemplate > </xctk:EditorTemplateDefinition > <xctk:EditorTemplateDefinition > <xctk:EditorTemplateDefinition.TargetProperties > <xctk:TargetPropertyType Type ="{x:Type s:Enum}" /> </xctk:EditorTemplateDefinition.TargetProperties > <xctk:EditorTemplateDefinition.EditingTemplate > <DataTemplate > <ComboBox ItemsSource ="{Binding PropertyType, Converter={x:Static propertyGrid:EnumValuesConverter.Instance}}" SelectedItem ="{Binding Value, Mode=TwoWay, UpdateSourceTrigger=PropertyChanged}" /> </DataTemplate > </xctk:EditorTemplateDefinition.EditingTemplate > </xctk:EditorTemplateDefinition > <xctk:EditorTemplateDefinition > <xctk:EditorTemplateDefinition.TargetProperties > <xctk:TargetPropertyType Type ="{x:Type s:Int32}" /> </xctk:EditorTemplateDefinition.TargetProperties > <xctk:EditorTemplateDefinition.EditingTemplate > <DataTemplate > <xctk:IntegerUpDown Value ="{Binding Value}" /> </DataTemplate > </xctk:EditorTemplateDefinition.EditingTemplate > </xctk:EditorTemplateDefinition > <xctk:EditorTemplateDefinition > <xctk:EditorTemplateDefinition.TargetProperties > <xctk:TargetPropertyType Type ="{x:Type s:Double}" /> </xctk:EditorTemplateDefinition.TargetProperties > <xctk:EditorTemplateDefinition.EditingTemplate > <DataTemplate > <xctk:DoubleUpDown Value ="{Binding Value}" /> </DataTemplate > </xctk:EditorTemplateDefinition.EditingTemplate > </xctk:EditorTemplateDefinition > </xctk:PropertyGrid.EditorDefinitions > </xctk:PropertyGrid >
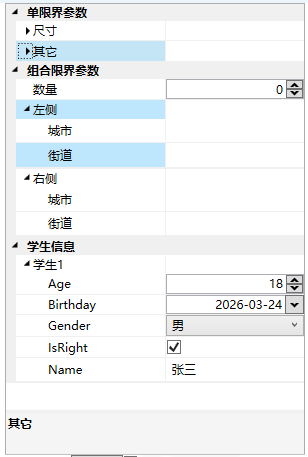
1 2 3 4 5 6 7 8 9 10 11 12 13 14 15 16 17 18 19 20 21 22 23 24 25 26 27 28 29 30 31 32 33 34 35 36 37 38 39 40 41 42 43 44 45 46 47 48 49 50 51 52 53 54 55 56 57 58 59 60 61 62 63 64 65 66 67 68 69 70 71 72 73 74 75 76 [CategoryOrder("单限界参数" ,1) ] [CategoryOrder("组合限界参数" , 2) ] [CategoryOrder("学生信息" , 3) ] public class AppConfig { [Category("单限界参数" ) ] [Display(Name = "尺寸" , Order = 0) ] public ProxySettings Proxy { get ; set ; } = new ProxySettings(); [Category("单限界参数" ) ] [Display(Name = "其它" , Order = 1) ] public ProxySettings Proxy2 { get ; set ; } = new ProxySettings(); [Category("组合限界参数" ) ] [Display(Name = "数量" , Order = 0) ] public int Number { get ; set ; } [Category("组合限界参数" ) ] [Display(Name = "左侧" , Order = 1) ] public Address ContactAddress { get ; set ; } = new Address(); [Category("组合限界参数" ) ] [Display(Name = "右侧" , Order = 2) ] public Address ContactAddress2 { get ; set ; } = new Address(); [Category("学生信息" ) ] [Display(Name = "学生1" ) ] public Student Student { get ; set ; } = new (); } [TypeConverter(typeof(ExpandableObjectConverter)) ] public class ProxySettings { [DisplayName("主机" ) ] public string Host { get ; set ; } = "127.0.0.1" ; [DisplayName("端口" ) ] public int Port { get ; set ; } = 8080 ; [DisplayName("用户名" ) ] public string UserName { get ; set ; } public override string ? ToString() { return "" ; } } [TypeConverter(typeof(ExpandableObjectConverter)) ] public class Address { [DisplayName("城市" ) ] public string City { get ; set ; } [DisplayName("街道" ) ] public string Street { get ; set ; } public override string ? ToString() { return "" ; } } [TypeConverter(typeof(ExpandableObjectConverter)) ] public class Student { public string Name { get ; set ; } = "张三" ; public int Age { get ; set ; } = 18 ; public DateTime Birthday { get ; set ; } = DateTime.Now; public bool IsRight { get ; set ; } = true ; public Gender Gender { get ; set ; } = Gender.男; public override string ? ToString() { return "" ; } } public enum Gender { 男, 女 }
指定各属性的分组和名称,并且可以指定分组及分组下各属性的顺序
支持子类嵌套([TypeConverter(typeof(ExpandableObjectConverter))])
如果设置AutoGenerateProperties="False",那么就需要手动指定要将后台类实例的哪些属性显示到PropertyGrid上;如果AutoGenerateProperties="True",默认所有属性会被显示。
1
2
3
<xctk:PropertyGrid.PropertyDefinitions> <xctk:PropertyDefinition TargetProperties="Name,Age,Grade,BirthDate,Hobby,IsRight"/> </xctk:PropertyGrid.PropertyDefinitions>
1
2
3
4
5
6
7
8
9
10
11
12
13
14
public class EnumValuesConverter : IValueConverter { public static EnumValuesConverter Instance = new EnumValuesConverter(); public object Convert (object value , Type targetType, object parameter, CultureInfo culture if (value is Type type && type.IsEnum) { return Enum.GetValues(type); } return new List<object >(); } public object ConvertBack (object value , Type targetType, object parameter, CultureInfo culture return value ; } }
效果如下:
对于常见数据类型,都内置有默认的属性编辑器(即修改属性的方式,文本框、日期选择器等)。
用户可以为属性自定义编辑器,以上代码为常见数据类型设置了编辑器。
也可以创建更加复杂的编辑器(对于复杂情况可以使用)
1
2
3
4
5
6
7
8
9
10
11
12
13
14
15
16
public class FirstNameEditor : Xceed.Wpf.Toolkit.PropertyGrid.Editors.ITypeEditor { public FrameworkElement ResolveEditor (Xceed.Wpf.Toolkit.PropertyGrid.PropertyItem propertyItem ) { TextBox textBox = new TextBox(); textBox.Background = new SolidColorBrush(Colors.Red); var _binding = new Binding("Value" ); _binding.Source = propertyItem; _binding.ValidatesOnExceptions = true ; _binding.ValidatesOnDataErrors = true ; _binding.Mode = propertyItem.IsReadOnly ? BindingMode.OneWay : BindingMode.TwoWay; BindingOperations.SetBinding(textBox, TextBox.TextProperty, _binding); return textBox; } }
1
2
3
4
5
public class CustomAttributEditorPerson { [Editor(typeof(FirstNameEditor), typeof(FirstNameEditor)) ] public string FirstName { get ; set ; } }