数据是任何软件系统的主角,软件系统的核心功能就是对数据进行存储、处理和展示。
数据存储形式主要包括数据库和文件,该过程相对独立,技术方案也相对成熟;相反,随着UI日趋复杂,数据处理和数据展示这两部分总是难解难分,开发者经常会将两者的代码混淆在一起,一不小心就会严重伤害到软件的可维护性。
WPF的数据绑定就是为了从本质上解决这个问题:将内存数据绑定到UI,内存数据和UI任何一方的变化都能马上同步到另一方,在XAML上实现UI编程,尽可能减少后端代码介入UI逻辑,让开发重心回归到数据处理上。
数据绑定的几个基本要素是:
(1)数据源和路径:将数据源的某一路径绑定到目标的某个属性上
(2)目标和属性
(3)绑定模式:Default(不同控件会有不同默认)、OneTime、OneWay(源→目标)、OneWayToSource(目标→源)、TwoWay(双向绑定)
(4)触发数据源更新的方式:Default(不同控件会有不同默认)、Explicit、LostFocus(控件拾取焦点时)、PropertyChanged(属性变化时)
以下例子将tb1的Text绑定到tb2的Text上,双向绑定可互相更新,当tb2的Text发生变化时立即更新tb1的Text:
1 2 3 4 5 6 7 8 9 10 11 12 13 14 15 <Window x:Class ="TestMvvm.Views.Test" xmlns ="http://schemas.microsoft.com/winfx/2006/xaml/presentation" xmlns:x ="http://schemas.microsoft.com/winfx/2006/xaml" xmlns:d ="http://schemas.microsoft.com/expression/blend/2008" xmlns:mc ="http://schemas.openxmlformats.org/markup-compatibility/2006" xmlns:local ="clr-namespace:TestMvvm.Views" mc:Ignorable ="d" Title ="Test" SizeToContent ="WidthAndHeight" > <StackPanel Orientation ="Vertical" > <TextBox x:Name ="tb1" Width ="100" Height ="20" Margin ="5" Text ="Hello Binding!" /> <TextBox x:Name ="tb2" Width ="100" Height ="20" Margin ="5" Text ="{Binding ElementName=tb1, Path=Text, Mode=TwoWay,UpdateSourceTrigger=PropertyChanged}" /> </StackPanel > </Window >
WPF的绑定可谓”招式众多“,主要体现在数据源的种类上,能熟练使用各种数据源也是开发者经验丰富的体现。
WPF支持的数据源种类:控件、普通类实例、DataContext、ItemsSource、资源、LINQ、ADO数据对象(DataTable或DataView)、XML等。
实际使用较多的是:控件、普通类实例、DataContext、ItemsSource和资源。其中控件相对简单,本文主要对另外四种常用数据源做介绍,其余种类可先有印象,使用时再做研究。
在界面上放置一个TextBox(tbShow),用于显示内存数据;还有两个Button,点击btn1会更改内存数据,点击btn2会显示内存数据。
1 2 3 4 5 6 7 8 9 10 11 12 13 14 15 <Window x:Class ="TestMvvm.Views.MainWindow" xmlns ="http://schemas.microsoft.com/winfx/2006/xaml/presentation" xmlns:x ="http://schemas.microsoft.com/winfx/2006/xaml" xmlns:d ="http://schemas.microsoft.com/expression/blend/2008" xmlns:mc ="http://schemas.openxmlformats.org/markup-compatibility/2006" xmlns:local ="clr-namespace:TestMvvm.Views" mc:Ignorable ="d" x:Name ="thisWin" Title ="用户登录" Height ="250" Width ="400" > <StackPanel Orientation ="Vertical" > <TextBox x:Name ="tbShow" /> <Button x:Name ="btn1" Content ="更改内存数据" Click ="btn1_Click" /> <Button x:Name ="btn2" Content ="显示内存数据" Click ="btn2_Click" /> </StackPanel > </Window >
在以上界面的后端代码中,定义了一个Student类,在窗体的构造函数中初始化一个Student实例student,并用代码将student的Name属性绑定到tb1的Text上,采用双向绑定。
1
2
3
4
5
6
7
8
9
10
11
12
13
14
15
16
17
18
19
20
21
22
23
24
25
26
27
28
29
30
31
32
33
34
35
36
37
using System.Windows;using System.Windows.Controls;using System.Windows.Data;namespace TestMvvm.Views { public partial class MainWindow : Window { Student student { get ; set ; } public MainWindow () InitializeComponent(); student = new Student(); student.Score = 90 ; Binding binding = new Binding(); binding.Source = student; binding.Path = new PropertyPath("Score" ); binding.Mode = BindingMode.TwoWay; binding.UpdateSourceTrigger = UpdateSourceTrigger.PropertyChanged; BindingOperations.SetBinding(this .tbShow, TextBox.TextProperty, binding); } private void btn1_Click (object sender, RoutedEventArgs e student.Score = 80 ; } private void btn2_Click (object sender, RoutedEventArgs e MessageBox.Show(student.Score.ToString()); } } public class Student { public int Score { get ; set ; } } }
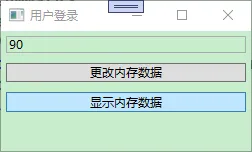
启动程序,tb1中的文本如我们所料,是90:
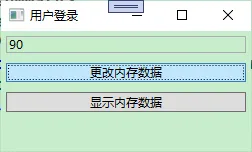
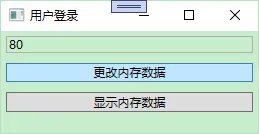
①按照我们的直观理解,当点击btn1时,student的Score属性值变为80,tb1里的内容会更新,但实际出乎我们意料了,不变:
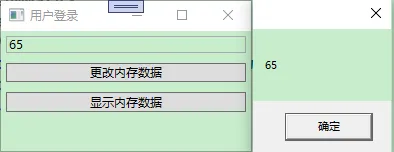
②手动修改tb1中的内容,内存数据会改变吗?会变:
根据①、②的测试,我们得出结论:将普通类实例作为源双向绑定到UI,UI变化可以同步至内存数据,但内存数据变化不会同步到UI。
解决方法:改造普通类,实现INotifyPropertyChanged接口,属性更新时手动触发属性修改事件处理器:
1
2
3
4
5
6
7
8
9
10
11
12
13
14
15
16
public class Student : INotifyPropertyChanged { public event PropertyChangedEventHandler PropertyChanged; private int score; public int Score { get { return score; } set { if (score != value ) { score = value ; if (PropertyChanged != null ) { this .PropertyChanged.Invoke(this , new PropertyChangedEventArgs("Score" )); } } } } }
我更喜欢的写法:
1
2
3
4
5
6
7
8
9
10
11
12
13
14
15
16
17
18
19
20
21
22
public class Student : NotifyPropertyChanged { private int score; public int Score { get { return score; } set { if (score != value ) { score = value ; RaisePropertyChanged(); } } } } public class NotifyPropertyChanged : INotifyPropertyChanged { public event PropertyChangedEventHandler PropertyChanged; public void RaisePropertyChanged ([CallerMemberName] string propertyName = null ) if (PropertyChanged != null ) { this .PropertyChanged.Invoke(this , new PropertyChangedEventArgs(propertyName)); } } }
总结:要想实现双向绑定双向同步,数据源必须实现INotifyPropertyChanged接口,并手动触发相应事件处理器。
为什么控件绑定不需要这样做呢?因为WPF控件本身已经做了这件事。
严格来说,DataContext只是一种绑定方式,而不是一种数据源。但因为这种方式太主流太重要了,所以单独分节来讲。
在上节中,采用代码进行数据绑定,实际上更好的方式是指定DataContext。
使用XAML进行绑定,不需要指定数据源。
1 2 3 4 5 6 7 8 9 10 11 12 13 14 15 <Window x:Class ="TestMvvm.Views.MainWindow" xmlns ="http://schemas.microsoft.com/winfx/2006/xaml/presentation" xmlns:x ="http://schemas.microsoft.com/winfx/2006/xaml" xmlns:d ="http://schemas.microsoft.com/expression/blend/2008" xmlns:mc ="http://schemas.openxmlformats.org/markup-compatibility/2006" xmlns:local ="clr-namespace:TestMvvm.Views" mc:Ignorable ="d" x:Name ="thisWin" Title ="用户登录" Height ="250" Width ="400" > <StackPanel Orientation ="Vertical" > <TextBox x:Name ="tbShow" Text ="{Binding Path=Score,Mode=TwoWay,UpdateSourceTrigger=PropertyChanged}" /> <Button x:Name ="btn1" Content ="更改内存数据" Click ="btn1_Click" /> <Button x:Name ="btn2" Content ="显示内存数据" Click ="btn2_Click" /> </StackPanel > </Window >
在后端代码中使用DataContext指定数据源:
1
2
3
4
5
6
7
8
9
Student student { get ; set ; } public MainWindow () InitializeComponent(); student = new Student(); student.Score = 80 ; this .DataContext = student; }
当一个控件没有指定数据源时,默认会以DataContext属性值作为数据源。
如果该控件自身的DataContext属性没有被赋值,就会沿着控件树向上找父类们的DataContext属性值,一旦找到就以它作为数据源,不再继续向上搜索。
如果找到的DataContext中没有绑定的属性,那么绑定失败。
集合控件有ItemsSource属性,指定该属性后,在XAML中重定义数据模板时就可以用到数据绑定,该方式与上节的DataContext非常类似。
推荐使用ObservableCollection集合类型为ItemsSource赋值,这样的话,当集合元素增加或减少时,数据会自动同步到UI,如下所示:
1
2
3
4
5
6
7
8
9
10
11
12
13
14
15
16
17
18
19
20
21
22
23
24
25
26
27
28
29
30
31
32
33
34
35
36
37
38
39
40
41
42
43
44
45
46
47
48
49
50
51
52
53
54
55
56
57
58
59
60
61
<Window x:Class="TestMvvm.Views.MainWindow" xmlns="http://schemas.microsoft.com/winfx/2006/xaml/presentation" xmlns:x="http://schemas.microsoft.com/winfx/2006/xaml" xmlns:d="http://schemas.microsoft.com/expression/blend/2008" xmlns:mc="http://schemas.openxmlformats.org/markup-compatibility/2006" xmlns:local="clr-namespace:TestMvvm.Views" xmlns:sys="clr-namespace:System;assembly=mscorlib" mc:Ignorable="d" x:Name="thisWin" Title="用户登录" Width="400" SizeToContent="Height" > <StackPanel x:Name="sp" Orientation="Vertical" > <TextBlock Text="Student ID:" FontWeight="Bold" Margin="5" /> <TextBox x:Name="textBoxId" Margin="5" /> <TextBlock Text="Student List:" FontWeight="Bold" Margin="5" /> <ListBox x:Name="listBoxStudents" Height="110" Margin="5" > <ListBox.ItemTemplate> <DataTemplate> <StackPanel Orientation="Horizontal" > <TextBlock Text="{Binding Path=Id}" Width="30" /> <TextBlock Text="{Binding Path=Name}" Width="60" /> <TextBlock Text="{Binding Path=Age}" Width="30" /> </StackPanel> </DataTemplate> </ListBox.ItemTemplate> </ListBox> <Button x:Name="btnChangeData" Click="btnChangeData_Click" Margin="5" Content="修改内存数据" /> </StackPanel> </Window> using System.Collections.ObjectModel;using System.Windows;namespace TestMvvm.Views { public partial class MainWindow : Window { ObservableCollection<Student> students; public MainWindow () InitializeComponent(); students = new ObservableCollection<Student>() { new Student() {Id=1 ,Name="Tim" ,Age=10 }, new Student() {Id=2 ,Name="Tom" ,Age=20 }, new Student(){Id=3 ,Name="Tony" ,Age=30 }, }; this .listBoxStudents.ItemsSource = students; } private void btnChangeData_Click (object sender, RoutedEventArgs e students.Add(new Student() { Id = 1 , Name = "Lizi" , Age = 10 }); students[0 ].Age = 50 ; } } public class Student { public int Id { get ; set ; } public string Name { get ; set ; } public int Age { get ; set ; } } }
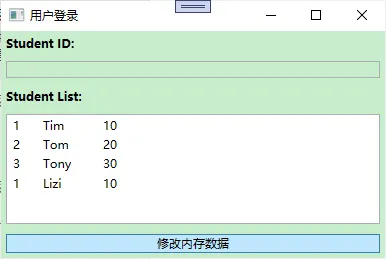
点击按钮修改内存数据后,会新增一条数据:
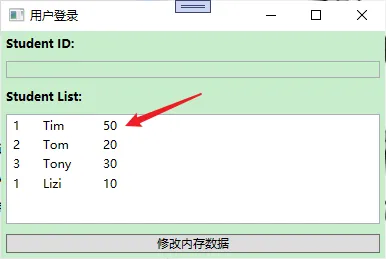
但是,会发现一个问题,点击按钮修改内存数据时,我们将第一个学生的你年龄修改为50,但是没有起作用,为什么呢?
原因在于,虽然使用了ObservableCollection集合,但是只会通知集合元素数量变化的修改,修改元素的内容不会激发修改,这时同样需要改造Student类,当其属性修改时触发事件。
1
2
3
4
5
6
7
8
9
10
11
12
13
14
15
16
17
18
19
20
21
22
23
24
25
26
27
28
29
30
31
32
33
34
35
36
37
38
39
40
41
42
43
public class Student : NotifyPropertyChanged { private int id; public int Id { get { return id; } set { if (id != value ) { id = value ; RaisePropertyChanged(); } } } private string name; public string Name { get { return name; } set { if (name != value ) { name = value ; RaisePropertyChanged(); } } } private int age; public int Age { get { return age; } set { if (age != value ) { age = value ; RaisePropertyChanged(); } } } } public class NotifyPropertyChanged : INotifyPropertyChanged { public event PropertyChangedEventHandler PropertyChanged; public void RaisePropertyChanged ([CallerMemberName] string propertyName = null ) if (PropertyChanged != null ) { this .PropertyChanged.Invoke(this , new PropertyChangedEventArgs(propertyName)); } } }
总结:使用ItemsSource为集合控件指定数据源时,如果需要双向同步,要使用ObservableCollection集合作为数据源,且集合元素类型要实现INotifyPropertyChanged接口,并在属性变化时触发相应事件。
如果定义了一个资源,且其类型与目标属性的类型一致,那么可以将该资源作为数据源指定给目标对象,不需要指定数据源属性名:
1 2 3 4 5 6 7 8 9 10 11 12 13 14 15 16 17 18 19 20 21 22 23 <Window x:Class ="TestMvvm.Views.MainWindow" xmlns ="http://schemas.microsoft.com/winfx/2006/xaml/presentation" xmlns:x ="http://schemas.microsoft.com/winfx/2006/xaml" xmlns:d ="http://schemas.microsoft.com/expression/blend/2008" xmlns:mc ="http://schemas.openxmlformats.org/markup-compatibility/2006" xmlns:local ="clr-namespace:TestMvvm.Views" xmlns:sys ="clr-namespace:System;assembly=mscorlib" mc:Ignorable ="d" x:Name ="thisWin" Title ="用户登录" Height ="250" Width ="400" > <Window.Resources > <sys:String x:Key ="myString1" > 这是测试代码 </sys:String > </Window.Resources > <StackPanel x:Name ="sp" Orientation ="Vertical" > <TextBox x:Name ="tbShow" Margin ="5" Text ="{Binding Source={StaticResource myString1}, Path=.}" /> <Button x:Name ="btn1" Margin ="5" Content ="更改内存数据" Click ="btn1_Click" /> <Button x:Name ="btn2" Margin ="5" Content ="显示内存数据" Click ="btn2_Click" /> </StackPanel > </Window >
当界面控件较多,且不同控件的某些属性值一样时,可以将共同的属性值提取出来作为资源变量,方便后期统一修改。
方法很多,这里只介绍个人认为最便利的方法,可以避免在ViewModel中创建绑定变量,并且不需要定义额外的转换器。
先定义一个标记扩展类:
1
2
3
4
5
6
7
8
9
10
11
12
13
14
15
16
17
18
19
20
21
22
23
24
25
26
27
28
29
30
31
32
33
34
35
36
37
38
39
40
public class EnumBindingSourceExtension : MarkupExtension { public Type EnumType { get ; private set ; } public EnumBindingSourceExtension (Type enumType ) { EnumType = enumType ?? throw new ArgumentNullException(nameof (enumType)); if (!enumType.IsEnum) throw new ArgumentException("Type must be an enum" ); } public override object ProvideValue (IServiceProvider serviceProvider ) { var values = Enum.GetValues(EnumType); return values.Cast<Enum>().Select(e => new { Value = e, Description = GetEnumDescription(e), ValueString = e.ToString() }).ToList(); } private static string GetEnumDescription (Enum value ) { FieldInfo fi = value .GetType().GetField(value .ToString()); var attributes = fi.GetCustomAttributes(typeof (DescriptionAttribute), false ); return attributes.Length > 0 ? ((DescriptionAttribute)attributes[0 ]).Description : value .ToString(); } } public enum MyEnum{ [Description("h" ) ] Hello, [Description("w" ) ] World, I, Am, Lizi }
直接在XAML文件中使用即可:
1 2 3 4 <ComboBox ItemsSource ="{local:EnumBindingSource {x:Type local:MyEnum}}" DisplayMemberPath ="ValueString" SelectedValuePath ="Value" SelectedValue ="{Binding Enum}" />
当以来属性A进行LINQ查询得到属性B时,当属性A发生变化时,使用OnPropertyChanged(nameof(B))通知属性B变化,这样属性B绑定控件会刷新。
可以把数据绑定看作连接两个岛屿的双向行车桥梁,数据如同商品一样在该通道上双向流通,这条通道上也设有关卡,可以对来往商品进行核检。
在WPF中,数据校验的机制有多种,单独写一篇文章进行结束,请移步到:WPF数据校验
某些情况下,数据源属性和目标属性的数据类型可能不一样,开发者希望数据转换能自动进行,这时就需要用到数据转换机制了。
以上节代码为例,我们希望UI文本框里显示分数的格式为”分数成绩为90,优秀!“,分数[0,60)为不及格,[60,85]为良好,[86,100]为优秀。
实现数据转换主要包括两个步骤:
(1)自定义数据转换类
1
2
3
4
5
6
7
8
9
10
11
12
13
14
15
16
17
18
public class ScoreConverter : IValueConverter { public object Convert (object value , Type targetType, object parameter, CultureInfo culture int score = 0 ; if (int .TryParse(value .ToString(), out score)) { if (score >= 0 && score <= 59 ) return $"分数成绩为{score} ,不合格!" ; else if (score >= 60 && score <= 85 ) return $"分数成绩为{score} ,良好!" ; else return $"分数成绩为{score} ,优秀!" ; } return null ; } public object ConvertBack (object value , Type targetType, object parameter, CultureInfo culture throw new NotImplementedException(); } }
(2)给Binding的Converter属性赋值
1 2 3 4 5 6 7 8 9 10 11 12 13 14 15 16 17 18 19 <Window x:Class ="TestMvvm.Views.MainWindow" xmlns ="http://schemas.microsoft.com/winfx/2006/xaml/presentation" xmlns:x ="http://schemas.microsoft.com/winfx/2006/xaml" xmlns:d ="http://schemas.microsoft.com/expression/blend/2008" xmlns:mc ="http://schemas.openxmlformats.org/markup-compatibility/2006" xmlns:local ="clr-namespace:TestMvvm.Views" mc:Ignorable ="d" x:Name ="thisWin" Title ="用户登录" Height ="250" Width ="400" > <Window.Resources > <local:ScoreConverter x:Key ="scoreConverter" /> </Window.Resources > <StackPanel x:Name ="sp" Orientation ="Vertical" > <TextBox x:Name ="tbShow" Margin ="5" Text ="{Binding Path=Score,Mode=TwoWay,UpdateSourceTrigger=PropertyChanged,Converter={StaticResource ResourceKey=scoreConverter}}" /> <Button x:Name ="btn1" Margin ="5" Content ="更改内存数据" Click ="btn1_Click" /> <Button x:Name ="btn2" Margin ="5" Content ="显示内存数据" Click ="btn2_Click" /> </StackPanel > </Window >
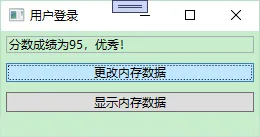
这时,修改数据源的数据,界面显示的信息是经过转换之后的信息:
当一个UI控件的某个属性值同时由多个数据源的多个属性控制时,就需要用到多路绑定,且多路绑定必须与多路数据转换同时使用。
例如,界面上有两个TextBox和一个Button,我们希望两个TextBox里面都有值的时候才激活Button。
(1)定义数据转换器
1
2
3
4
5
6
7
8
9
10
11
public class MyConverter : IMultiValueConverter { public object Convert (object [] values, Type targetType, object parameter, CultureInfo culture if (!values.Cast<string >().Any(text => string .IsNullOrWhiteSpace(text))) return true ; return false ; } public object [] ConvertBack (object value , Type[] targetTypes, object parameter, CultureInfo culture throw new NotImplementedException(); } }
(2)设置多路绑定
1 2 3 4 5 6 7 8 9 10 11 12 13 14 15 16 17 18 19 20 21 22 23 24 25 26 27 28 <Window x:Class ="TestMvvm.Views.MainWindow" xmlns ="http://schemas.microsoft.com/winfx/2006/xaml/presentation" xmlns:x ="http://schemas.microsoft.com/winfx/2006/xaml" xmlns:d ="http://schemas.microsoft.com/expression/blend/2008" xmlns:mc ="http://schemas.openxmlformats.org/markup-compatibility/2006" xmlns:local ="clr-namespace:TestMvvm.Views" mc:Ignorable ="d" x:Name ="thisWin" Title ="测试" SizeToContent ="WidthAndHeight" > <Window.Resources > <local:MyConverter x:Key ="myConverter" /> </Window.Resources > <StackPanel x:Name ="sp" Orientation ="Vertical" > <TextBox x:Name ="tb1" Width ="150" Height ="20" Margin ="5" /> <TextBox x:Name ="tb2" Width ="150" Height ="20" Margin ="5" /> <Button x:Name ="btn1" Width ="150" Height ="20" Margin ="5" Content ="提交" > <Button.IsEnabled > <MultiBinding Converter ="{StaticResource myConverter}" Mode ="OneWay" > <MultiBinding.Bindings > <Binding ElementName ="tb1" Path ="Text" /> <Binding ElementName ="tb2" Path ="Text" /> </MultiBinding.Bindings > </MultiBinding > </Button.IsEnabled > </Button > </StackPanel > </Window >
(1)在实际项目中要善用WPF绑定,数据→UI的逻辑要尽可能通过数据绑定来实现,UI逻辑里不要有对数据处理的代码。
(2)数据绑定的重难点在于如何使用不同的数据源,在实际项目中要不断丰富自己的招式。
(3)数据校验和数据转换虽然是辅助工具,但对它们的熟练使用能极大增强数据绑定应对实际复杂问题的杀伤力。
