mybatis是Java中非常流行的一个数据库访问工具,比较底层,能灵活配置SQL语句,本文对其基本用法做一个简单介绍,借此机会了解下Java生态中的数据库读写技术。当然,技术是相通的,. NET之Dapper类似Java之mybatis,. NET之EF类似Java之Spring JPA,前者底层,后者高层,前者功能颗粒度小更灵活,后者功能强大更重量。在合适的场景选择合适的技术是最重要的。
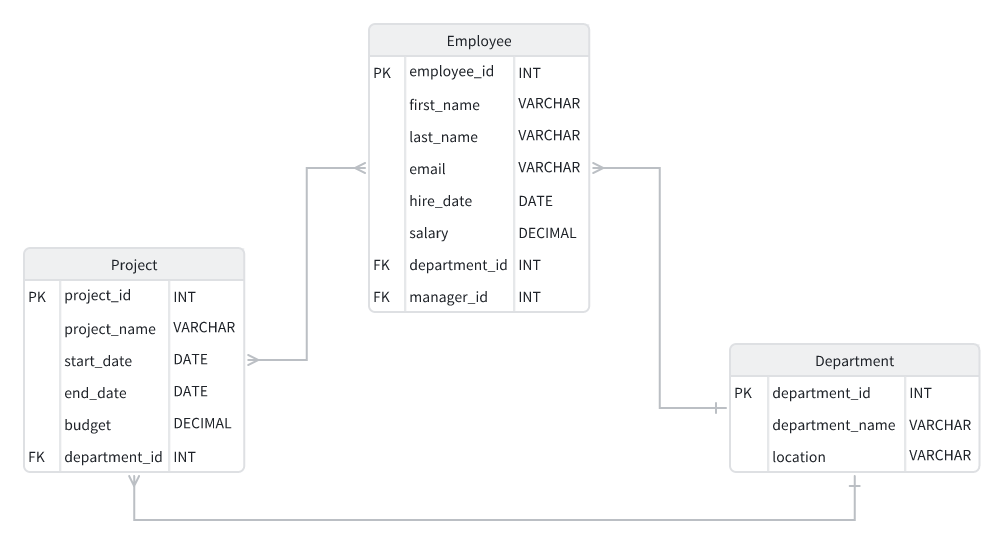
Department与Employee是一对多关系。
Department与Project是一对多关系。
Employee与Project是多对多关系。
(注:以上是ER图的Crow’s notion表达方式。)
1
2
3
4
5
6
7
8
9
10
11
12
13
14
15
16
17
18
19
20
21
22
23
24
25
26
27
28
29
30
31
32
33
34
35
36
37
38
39
40
41
42
43
44
45
46
47
48
49
50
51
52
53
54
55
56
57
58
59
60
61
62
63
64
65
66
67
68
69
70
71
72
73
74
75
76
77
78
79
80
81
82
83
84
85
86
87
88
89
90
91
92
93
94
95
96
97
98
99
100
101
102
103
104
105
106
107
108
109
<?xml version="1.0" encoding="UTF-8" ?> <project xmlns ="http://maven.apache.org/POM/4.0.0" xmlns:xsi ="http://www.w3.org/2001/XMLSchema-instance" xsi:schemaLocation ="http://maven.apache.org/POM/4.0.0 http://maven.apache.org/xsd/maven-4.0.0.xsd" > <modelVersion > 4.0.0</modelVersion > <groupId > org.example</groupId > <artifactId > mybatis01</artifactId > <version > 1.0-SNAPSHOT</version > <properties > <maven.compiler.source > 17</maven.compiler.source > <maven.compiler.target > 17</maven.compiler.target > <project.build.sourceEncoding > UTF-8</project.build.sourceEncoding > <kotlin.version > 2.2.0</kotlin.version > </properties > <dependencies > <dependency > <groupId > org.mybatis</groupId > <artifactId > mybatis</artifactId > <version > 3.5.19</version > </dependency > <dependency > <groupId > mysql</groupId > <artifactId > mysql-connector-java</artifactId > <version > 8.0.33</version > </dependency > <dependency > <groupId > org.projectlombok</groupId > <artifactId > lombok</artifactId > <version > 1.18.38</version > </dependency > </dependencies > <build > <plugins > <plugin > <groupId > org.apache.maven.plugins</groupId > <artifactId > maven-jar-plugin</artifactId > <version > 3.3.0</version > <configuration > <archive > <manifest > <mainClass > org.example.App</mainClass > </manifest > </archive > </configuration > </plugin > <plugin > <groupId > org.apache.maven.plugins</groupId > <artifactId > maven-assembly-plugin</artifactId > <version > 3.7.1</version > <configuration > <descriptorRefs > <descriptorRef > jar-with-dependencies</descriptorRef > </descriptorRefs > <archive > <manifest > <mainClass > org.example.App</mainClass > </manifest > </archive > </configuration > <executions > <execution > <phase > package</phase > <goals > <goal > single</goal > </goals > </execution > </executions > </plugin > <plugin > <groupId > org.apache.maven.plugins</groupId > <artifactId > maven-compiler-plugin</artifactId > <executions > <execution > <id > default-compile</id > <phase > none</phase > </execution > <execution > <id > default-testCompile</id > <phase > none</phase > </execution > <execution > <id > compile</id > <phase > compile</phase > <goals > <goal > compile</goal > </goals > </execution > <execution > <id > testCompile</id > <phase > test-compile</phase > <goals > <goal > testCompile</goal > </goals > </execution > </executions > </plugin > </plugins > </build > </project >
lombok:快速定义数据类,避免手写各种get/set函数。
maven-jar-plugin、maven-assembly-plugin可以将应用打包成一个独立jar包。
使用lombok可以方便定义模型类,不用手动定义get和set接口,从而简化代码量。
1
2
3
4
5
6
7
8
9
10
11
12
13
14
package org.example.model;import lombok.Data;import java.util.List;@Data public class Department { private Integer departmentId; private String departmentName; private String location; private List<Employee> employees; private List<Project> projects; }
1
2
3
4
5
6
7
8
9
10
11
12
13
14
15
16
17
18
19
20
21
22
23
package org.example.model;import lombok.Data;import java.math.BigDecimal;import java.util.Date;import java.util.List;@Data public class Employee { private Integer employeeId; private String firstName; private String lastName; private String email; private Date hireDate; private BigDecimal salary; private Integer departmentId; private Integer managerId; private Department department; private Employee manager; private List<Project> projects; }
1
2
3
4
5
6
7
8
9
10
11
package org.example.model;import lombok.Data;@Data public class EmployeeProject { private Integer projectId; private String projectName; private Double hoursWorked; private String role; }
1
2
3
4
5
6
7
8
9
10
11
12
13
14
15
16
17
18
19
20
package org.example.model;import lombok.Data;import java.math.BigDecimal;import java.util.Date;import java.util.List;@Data public class Project { private Integer projectId; private String projectName; private Date startDate; private Date endDate; private BigDecimal budget; private Integer departmentId; private Department department; private List<Employee> employees; }
映射定义是mybatis的灵魂,有两种方法:①在mapper类中通过注解定义;②在xml文件中定义。后者更加灵活和强大,推荐后者!
1
2
3
4
5
6
7
8
9
10
11
12
13
package org.example.mapper;import org.example.model.Employee;import java.util.List;public interface EmployeeMapper { List<Employee> findAll () ; Employee findById (int id) ; int insert (Employee employee) ; int update (Employee employee) ; int deleteById (int id) ; List<Employee> findByDepartmentId (int departmentId) ; }
熟练使用mybatis的前提是精通SQL复杂查询。在配置文件中需要为mapper类中的每个增删改查接口进行SQL语句配置,如果是单表查询就非常简单,如果是多表联合查询就有很多技巧:
使用collection可以定义一对多查询。
使用association可以定义一对一查询。
1
2
3
4
5
6
7
8
9
10
11
12
13
14
15
16
17
18
19
20
21
22
23
24
25
26
27
28
29
30
31
32
33
34
35
36
37
38
39
40
41
42
43
44
45
46
47
48
49
50
51
52
53
54
55
56
57
58
59
60
61
62
63
64
65
66
67
68
69
70
71
72
73
74
75
76
77
78
79
80
81
82
83
84
85
86
87
88
89
90
91
92
93
94
95
96
97
<?xml version="1.0" encoding="UTF-8" ?> <!DOCTYPE mapper PUBLIC "-//mybatis.org//DTD Mapper 3.0//EN" "http://mybatis.org/dtd/mybatis-3-mapper.dtd" > <mapper namespace ="org.example.mapper.EmployeeMapper" > <resultMap id ="employeeResultMap" type ="org.example.model.Employee" > <id property ="employeeId" column ="employee_id" /> <result property ="firstName" column ="first_name" /> <result property ="lastName" column ="last_name" /> <result property ="email" column ="email" /> <result property ="hireDate" column ="hire_date" /> <result property ="salary" column ="salary" /> <result property ="departmentId" column ="department_id" /> <result property ="managerId" column ="manager_id" /> <association property ="department" javaType ="org.example.model.Department" > <id column ="department_id" property ="departmentId" /> <result column ="department_name" property ="departmentName" /> <result column ="location" property ="location" /> </association > <collection column ="employee_id" property ="projects" javaType ="ArrayList" ofType ="org.example.model.Project" select ="findProjectsByEmployeeId" /> </resultMap > <select id ="findAll" resultMap ="employeeResultMap" > SELECT * FROM employees e JOIN departments d ON e.department_id = d.department_id </select > <select id ="findById" resultMap ="employeeResultMap" parameterType ="int" > SELECT * FROM employees e JOIN departments d ON e.department_id = d.department_id WHERE employee_id = #{id} </select > <insert id ="insert" parameterType ="org.example.model.Employee" useGeneratedKeys ="true" keyProperty ="employeeId" > INSERT INTO employees (first_name, last_name, email, hire_date, salary, department_id, manager_id) VALUES (#{firstName}, #{lastName}, #{email}, #{hireDate}, #{salary}, #{departmentId}, #{managerId}) </insert > <update id ="update" parameterType ="org.example.model.Employee" > UPDATE employees SET first_name = #{firstName}, last_name = #{lastName}, email = #{email}, hire_date = #{hireDate}, salary = #{salary}, department_id = #{departmentId}, manager_id = #{managerId} WHERE employee_id = #{employeeId} </update > <delete id ="deleteById" parameterType ="int" > DELETE FROM employees WHERE employee_id = #{id} </delete > <select id ="findByDepartmentId" resultMap ="employeeResultMap" parameterType ="int" > SELECT * FROM employees e JOIN departments d ON e.department_id = d.department_id WHERE department_id = #{departmentId} </select > <resultMap id ="ProjectResultMap" type ="org.example.model.Project" > <id column ="project_id" property ="projectId" /> <result column ="project_name" property ="projectName" /> <result column ="start_date" property ="startDate" /> <result column ="end_date" property ="endDate" /> <result column ="budget" property ="budget" /> </resultMap > <select id ="findProjectsByEmployeeId" resultMap ="ProjectResultMap" > SELECT p.* FROM projects p JOIN employee_projects ep ON p.project_id = ep.project_id WHERE ep.employee_id = #{id} </select > </mapper >
1
2
3
4
5
6
7
8
9
10
11
12
13
14
15
16
17
18
19
20
21
22
23
24
25
26
27
28
<?xml version="1.0" encoding="UTF-8" ?> <!DOCTYPE configuration PUBLIC "-//mybatis.org//DTD Config 3.0//EN" "http://mybatis.org/dtd/mybatis-3-config.dtd" > <configuration > <settings > <setting name ="mapUnderscoreToCamelCase" value ="true" /> <setting name ="lazyLoadingEnabled" value ="true" /> <setting name ="aggressiveLazyLoading" value ="false" /> </settings > <environments default ="development" > <environment id ="development" > <transactionManager type ="JDBC" /> <dataSource type ="POOLED" > <property name ="driver" value ="com.mysql.cj.jdbc.Driver" /> <property name ="url" value ="jdbc:mysql://localhost:3306/testdb01?useSSL=FALSE" /> <property name ="username" value ="root" /> <property name ="password" value ="123456" /> </dataSource > </environment > </environments > <mappers > <package name ="org.example.mapper" /> </mappers > </configuration >
1
2
3
4
5
6
7
8
9
10
11
12
13
14
15
16
17
18
19
20
21
22
23
24
25
26
package org.example;import org.apache.ibatis.io.Resources;import org.apache.ibatis.session.SqlSession;import org.apache.ibatis.session.SqlSessionFactoryBuilder;import org.example.mapper.EmployeeMapper;import org.example.model.Employee;import java.io.IOException;public class App { public static void main (String[] args) throws IOException { String resource = "mybatis-config.xml" ; var inputStream = Resources.getResourceAsStream(resource); var sqlSessionFactory = new SqlSessionFactoryBuilder ().build(inputStream); try (SqlSession session = sqlSessionFactory.openSession()) { var mapper = session.getMapper(EmployeeMapper.class); System.out.println("---------------------------------------" ); var employees = mapper.findAll(); for (Employee employee : employees) { System.out.println(employee); } } } }
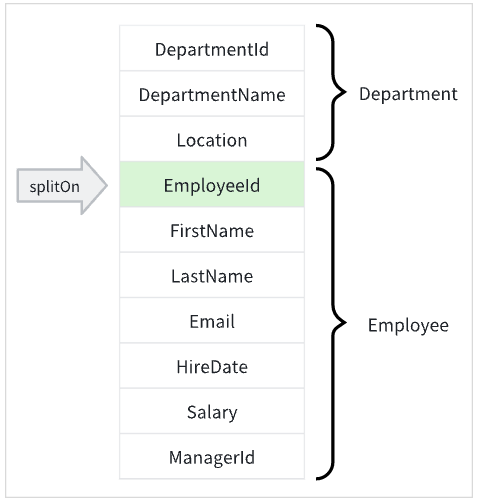
Dapper是.NET生态中的轻量级ORM框架,性能极强,接近ADO.NET,在某些场景下是最佳选择,下面以一对多联表查询为例,展示其联表查询特点。
1
2
3
4
5
6
7
8
9
10
11
12
13
14
15
16
17
18
19
20
21
22
23
24
25
26
27
28
29
30
31
32
33
34
35
36
37
38
39
40
41
static void Main (string [] args var connectionString = "Server=localhost;Database=testdb01;User ID=root;Password=123456;" ; using (IDbConnection connection = new MySqlConnection(connectionString)) { connection.Open(); string sql = @"SELECT d.department_id AS DepartmentId, d.department_name AS DepartmentName, d.location AS Location, e.employee_id AS EmployeeId, e.first_name AS FirstName, e.last_name AS LastName, e.email AS Email, e.hire_date AS HireDate, e.salary AS Salary, e.manager_id AS ManagerId FROM departments d LEFT JOIN employees e ON d.department_id=e.department_id ORDER BY d.department_id" ; var departmentDict = new Dictionary<int , Department>(); var result = connection.Query<Department, Employee, Department>(sql, (department, employee) => { if (!departmentDict.TryGetValue(department.DepartmentId, out var deptEntry)) { deptEntry = department; deptEntry.Employees = new List<Employee>(); departmentDict.Add(deptEntry.DepartmentId, deptEntry); } if (employee != null && employee.EmployeeId > 0 ) { deptEntry.Employees.Add(employee); } return deptEntry; }, splitOn: "EmployeeId" ); var departments = departmentDict.Values.ToList(); foreach (var dept in departments) { Console.WriteLine($"Department: {dept.DepartmentName} " ); foreach (var emp in dept.Employees) { Console.WriteLine($" - {emp.FirstName} {emp.LastName} " ); } } Console.ReadKey(); } }
上述代码通过调用Query函数实现联表查询,以EmployeeId为界,将查询出来的数据分成两个部分,依次赋值到Department和Employee实例,参看下图。并且需要手动处理给Employees属性赋值的逻辑,这里借助字典辅助实现。